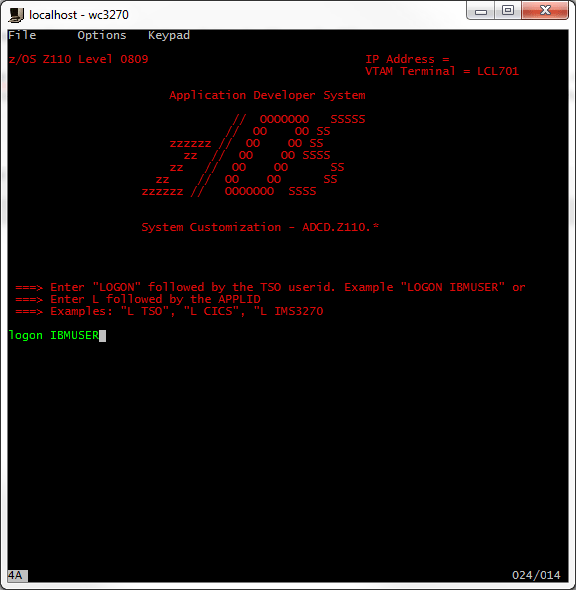
I recently stumbled across some (illegal) Z/OS emulation files for Hercules on The Pirate Bay a while back, but one thing which I couldn’t figure out was to actually get them working. With a little bit of searching, I’ve finally figured it out. This guide should help anyone who has absolutely no background with IBM mainframes or Hercules – but for some reason wishes to play with a mainframe – to get started.
Step 1: Required Programs and Files
You will need to download and install:
Secondly, you will need to obtain the Z/OS emulation files for Hercules (hint: search TPB or google ‘IBM Z OS Emulation files’)
Step 2: Configure your 3270 Terminal Emulator
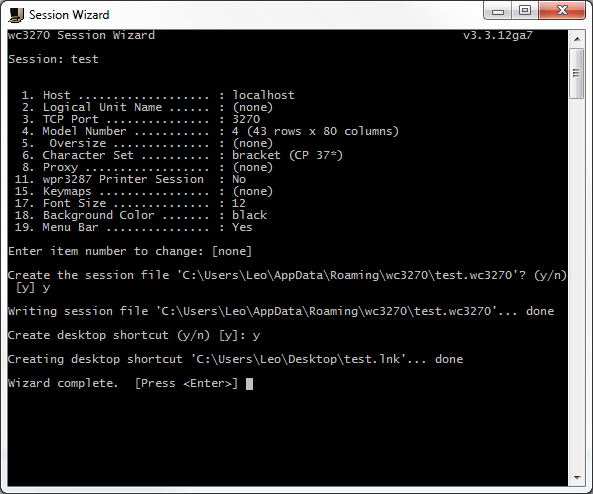
Open the wc3270 Session Wizard and create a new session with the host set to localhost and the TCP port number set to 3270. Be sure to save your session by hitting ‘[Enter]’ at the menu. You may want to create a desktop shortcut to be used later.
Step 3: Configure hercules.cnf
Ensure that your hercules.cnf file references your DASD devices correctly. The paths from the configuration file may be relative. However, in my case, I’ve provided absolute paths.
Note that my DSAD files are on my D:\ibm\cckd\ directory. If you are using relative paths, ensure that your hercules.cnf file is in the correct location, relative to your cckd files.
Ensure your display terminals are set to 3270.
My hercules.cnf is as follows:
#

# Hercules Emulator Control file...

# Description:

# MaxShutdownSecs: 15

#

#

# System parameters

#
ARCHMODE z/Arch
ALRF ENABLE
CCKD RA=2,RAQ=4,RAT=2,WR=2,GCINT=5,GCPARM=0,NOSTRESS=0,TRACE=0,FREEPEND=-1
CNSLPORT 3270
CONKPALV (3,1,10)
CPUMODEL 3090
CPUSERIAL 012345
DIAG8CMD ENABLE
ECPSVM YES
LOADPARM 0A95DB..
LPARNAME HERCULES
MAINSIZE 1024
MOUNTED_TAPE_REINIT DISALLOW
NUMCPU 4
OSTAILOR Z/OS
PANRATE 80
PGMPRDOS LICENSED
SHCMDOPT NODIAG8
SYSEPOCH 1900
TIMERINT 50
TZOFFSET +1400
YROFFSET 0
HERCPRIO 0
TODPRIO -20
DEVPRIO 8
CPUPRIO 0
PANTITLE z/OS 1.9 IPL A80?
# Display Terminals
0700 3270
0701 3270
0702 3270
0703 3270
0704 3270
# DASD Devices
0A81 3390 D:/ibm/cckd/zares1.cckd sf=shadow/zares1_*
0A82 3390 D:/ibm/cckd/zares2.cckd sf=shadow/zares2_*
0A83 3390 D:/ibm/cckd/zadb81.cckd sf=shadow/zadb81_*
0A84 3390 D:/ibm/cckd/zadb82.cckd sf=shadow/zadb82_*
0A85 3390 D:/ibm/cckd/zadb83.cckd sf=shadow/zadb83_*
0A86 3390 D:/ibm/cckd/zadb84.cckd sf=shadow/zadb84_*
0A87 3390 D:/ibm/cckd/zadb91.cckd sf=shadow/zadb91_*
0A88 3390 D:/ibm/cckd/zadb92.cckd sf=shadow/zadb92_*
0A89 3390 D:/ibm/cckd/zacic1.cckd sf=shadow/zacic1_*
0A8A 3390 D:/ibm/cckd/zadis1.cckd sf=shadow/zadis1_*
0A8B 3390 D:/ibm/cckd/zadis2.cckd sf=shadow/zadis2_*
0A8C 3390 D:/ibm/cckd/zadis3.cckd sf=shadow/zadis3_*
0A8D 3390 D:/ibm/cckd/zadis4.cckd sf=shadow/zadis4_*
0A8E 3390 D:/ibm/cckd/zadis5.cckd sf=shadow/zadis5_*
0A8F 3390 D:/ibm/cckd/zadis6.cckd sf=shadow/zadis6_*
0A90 3390 D:/ibm/cckd/zaims1.cckd sf=shadow/zaims1_*
0A91 3390 D:/ibm/cckd/zaprd1.cckd sf=shadow/zaprd1_*
0A92 3390 D:/ibm/cckd/zaprd2.cckd sf=shadow/zaprd2_*
0A93 3390 D:/ibm/cckd/zaprd3.cckd sf=shadow/zaprd3_*
0A94 3390 D:/ibm/cckd/zaprd4.cckd sf=shadow/zaprd4_*
0A95 3390 D:/ibm/cckd/zasys1.cckd sf=shadow/zasys1_*
0A96 3390 D:/ibm/cckd/zauss1.cckd sf=shadow/zauss1_*
0A97 3390 D:/ibm/cckd/zawas1.cckd sf=shadow/zawas1_*
0A98 3390 D:/ibm/cckd/zawas2.cckd sf=shadow/zawas2_*
0A99 3390 D:/ibm/cckd/zawas3.cckd sf=shadow/zawas3_*
0A9A 3390 D:/ibm/cckd/sares1.cckd sf=shadow/sares1_*
Step 4: Starting Hercules
Start hercules on the same directory as your hercules.cnf file. In my case:
D:\ibm>"C:\Program Files\Hercules\Hercules 3.07 (64 Bit)\hercules.exe"
Hercules should start and you should see something similar to:

Press ‘ESC’ to switch to the graphic mode. Start two instances of the 3270 terminals that was made and configured in Step 2. The first will be the console terminal, the second will be the TSO terminal. If everything works, you should see two terminals binded to Hercules:
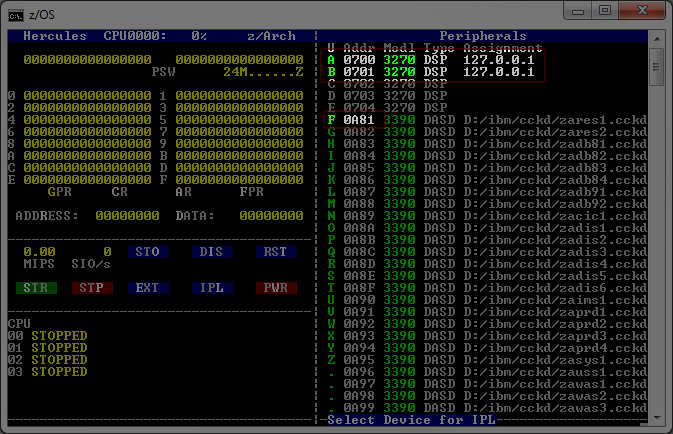
To start Z/OS, press ‘L’ for IPL, then F for the first Z/OS disk device (as highlighted above). Z/OS should begin loading.
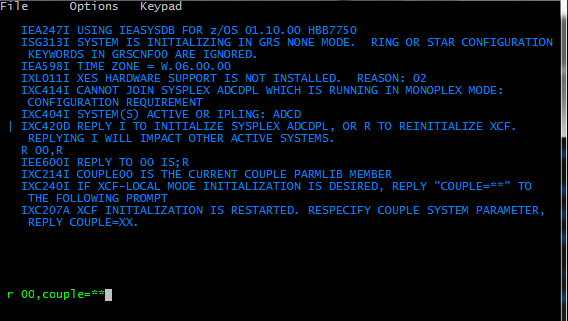
The terminal console should halt and prompt whether to initialize sysplex ADCDPL or to reinitalize XCF. Enter ‘r 00,r’
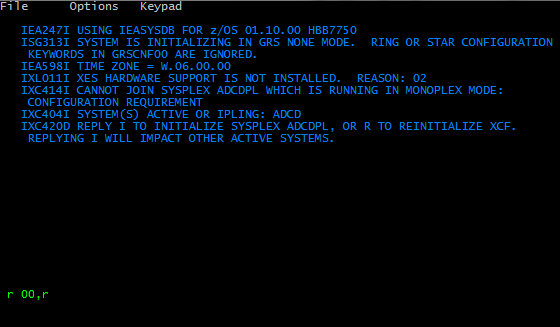
It will then prompt asking for the couple system parameter. Enter ‘r 00,couple=**’
Step 5: Have Fun
The login screen should appear on the second terminal. You may login as ‘IBMUSER’ with the password ‘SYS1’.
