Change Places Bar Locations for File Dialog Boxes in Windows 7

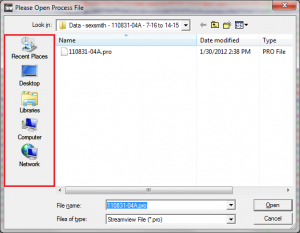
In case you wanted to change the default locations displayed in the places bar on the left of a FileDialog box such as the one shown below under Windows 7, do the following:

run gpedit.msc

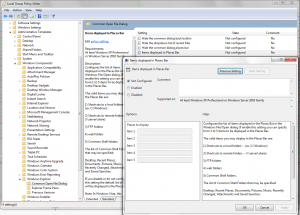
Navigate to User Configuration -> Administrative templates -> Windows Components -> Windows Explorer -> Common Open File Dialog -> Double Click on ‘Items displayed in Places Bar’

On the “Items displayed in Places Bar” window, select Enabled and enter the 5 items that is to be displayed below. Keywords such as ‘Desktop’, ‘Recent Places’, ‘Documents’, ‘Pictures’, etc. can be used in place of the path.

Disable Opera Error Console

One thing that’s been bugging me a lot with Opera is the fact that the error console pops up when errors occur on a web page. This is great and all if you’re trying to debug your own website, however not so much when I’m trying to find a solution to a compile error at 3 in the morning.

As of this writing, Opera 11.51 is the latest version. I can’t guarantee this will work for later versions.

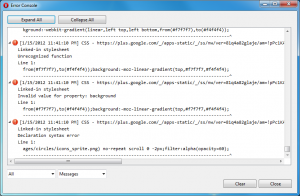
In order to disable this window from popping up, go to opera:config and search for “Error Console Filter”. You should see something similar to:

The Error Console Filter

Clear the field such that the filter is empty, and then click on ‘Save’.

Presto! The error console shall bug you no more.

Setting up Apache 2.2, MySQL 5.5 + Sphinx 2.0, PHP 5.3, a Scripted Guide

Similar to the previous scripted guide, this script will download the source for Apache, MySQL (and optionally with Sphinx, steps denoted in red font), and PHP and compile it under CentOS 5 and 6 on a x86-64 platform.

I’ve had this type of script for a few years now due to the amount of times I’ve had to provision a VPS from scratch. I simply copy/paste the script onto a clean VPS and away it goes setting up a LAMP server from source. This script should not require any existing requisites and should work out-of-the-box on a clean installation of CentOS 6.


#
# We need a few packages in order to compile apache, mysql and PHP from rpmforge.
# Import the key and install the repo.

cd
wget http://packages.sw.be/rpmforge-release/rpmforge-release-0.5.2-2.el6.rf.x86_64.rpm
rpm --import http://apt.sw.be/RPM-GPG-KEY.dag.txt
rpm -K rpmforge-release-0.5.2-2.el6.rf.*.rpm
rpm -i rpmforge-release-0.5.2-2.el6.rf.*.rpm

# Install all prerequisites.
yum -y install make autoconf g++ gcc-c++ libtermcap-devel libgcc-c++ libtool gcc libpng-devel libjpeg-devel libxml1-devel libxml2-devel curl curl-devel libmcrypt libmcrypt-devel libtool-ltdl-devel libxml2.x86_64 libxml2-devel.x86_64 curl-devel.x86_64 openssl-devel

# Download the source files. Sphinx is optional.
mkdir src
cd ~/src
wget http://host.steamr.com/supportfiles/httpd-2.2.21.tar.gz
wget http://host.steamr.com/supportfiles/mysql-5.5.16.tar.gz
wget http://host.steamr.com/supportfiles/php-5.3.8.tar.gz
wget http://host.steamr.com/supportfiles/sphinx-2.0.1-beta.tar.gz

# Extract all archives
for f in `ls *.tar.gz` ; do tar -xzf $f ; done


#
# Setting up apache into /opt/apache
#

cd /root/src/http*/
./configure --prefix=/opt/apache --enable-so --enable-rewrite --enable-ssl --enable-setenvif
make
make install

#
# Setting up MySQL into /opt/mysql.
# Note: MySQL 5.5 and above will require cmake.
#

yum -y install cmake
cd /root/src/mysql*/


# If you wish to compile MySQL with Sphinx, run the following:
cp -R ../sphinx-*/mysqlse/ storage/sphinx
sh BUILD/autorun.sh
./configure --prefix=/opt/mysql --with-plugins=sphinx --with-unix-socket-path=/opt/mysql/mysql.sock --without-man --enable-shared --without-debug --enable-assembler --with-ssl CFLAGS=-O3 'CXXFLAGS=-O3 -fno-exceptions -felide-constructors -fno-rtti' CXX=gcc


# Otherwise, to compile MySQL without Sphinx run:
./configure --prefix=/opt/mysql --with-unix-socket-path=/opt/mysql/mysql.sock --without-man --enable-shared --without-debug --enable-assembler --with-ssl CFLAGS=-O3 'CXXFLAGS=-O3 -fno-exceptions -felide-constructors -fno-rtti' CXX=gcc

make
make install

# Setup the init scripts
/bin/cp support-files/mysql.server /etc/init.d/mysql
chmod 755 /etc/init.d/mysql
ln -s /etc/init.d/mysql /etc/rc3.d/S40mysql

# Copy the default configuration
/bin/cp support-files/my-medium.cnf /etc/my.cnf

# Setup the mysql system account
/usr/sbin/useradd -r mysql

# Update the MySQL permissions
cd /opt/mysql
chown -R mysql .
chgrp -R mysql .

# When setting up the initial database on MySQL 5.4 or earlier, run:
# /opt/mysql/bin/mysql_install_db --user=mysql
# On MySql 5.5 or later, run:

/opt/mysql/scripts/mysql_install_db --user=mysql --basedir=/opt/mysql

# Ensure the new database files created from the previous step is owned by mysql
chown -R mysql /opt/mysql

# Start MySQL manually:
/opt/mysql/bin/mysqld_safe --user=mysql &


#
# MySQL should now be running. You can verify this by running:
# ps -A|grep mysql
#

#
# Set the lib paths of mysql so the libmysqlclient.so or w/e can be found
#

echo "/opt/mysql/lib/mysql" > /etc/ld.so.conf.d/mysql.conf
/sbin/ldconfig


#
# Setting up Sphinx
# NOTE: You must have sphinx compiled with mysql from the previous step.
# You may skip this step if you do not wish to have Sphinx and continue to PHP.
#

cd /root/src/sphinx*
./configure --prefix=/opt/sphinx --with-mysql
make
make install

# The init script used by Sphinx requires sudo.
yum -y install sudo

# Setup the default config
/bin/cp /root/sphinx.conf /opt/sphinx/etc/sphinx.conf

# Setup the init scripts
cp contrib/scripts/searchd /etc/init.d/
chmod 777 /etc/init.d/searchd
ln -s /etc/init.d/searchd /etc/init.d/S55searchd

# Create the sphinx system account and ensure everything under /opt/sphinx/var is owned by sphinx.
useradd -r searchd
cd /opt/sphinx
chown -R searchd:searchd var

#
# Setup PHP as a module for apache:
#

cd /root/src/php*/
./configure --prefix=/opt/php5 --with-apxs2=/opt/apache/bin/apxs --with-config-file-path=/etc/ --with-gd --enable-shmop --enable-track-vars --enable-ftp --enable-sockets --enable-exif --enable-zip --enable-sysvsem --with-zlib --enable-sysvshm --enable-magic-quotes --with-jpeg-dir --with-png-dir --enable-mbstring --enable-embedded-mysqli=shared --with-curl --with-mcrypt --with-mysql=/opt/mysql --with-mysqli=/opt/mysql/bin/mysql_config
# If you want imap support: use options --with-imap --with-imap-ssl=/usr/include/openssl --with-kerberos
make
make install

#
# At this stage, apache should have the PHP module installed.
# NOTE: Since apache does not come with an init script, you must install
# this manually. Refer to http://leo.steamr.com/?p=229 for the complete
# script. Ensure to change the path (in red) to the correct path to httpd.
# In this case, /opt/apache/bin/httpd
#

Setting up Nagios 3.3.1, a scripted guide

Since I wanted to automate the task of setting up a clean install of Nagios, I’ve made a script which will setup Nagios with apache from source. This script can be used as a how-to guide for anyone who’s trying to setup nagios for the first time. However, the main purpose is to enable me to quickly deploy a Nagios installation using an existing script.

#
# Setting up nagios 3.3.1 + nagios plugins 1.4.15 How-To Guide
#
# This guide will compile nagios from source, configure apache to
# serve nagios from the /nagios/ directory, and basic configuration
# of nagios.
#
# Nagios will be installed in the default /usr/local/nagios/
# directory. Change this by providing the --prefix argument when
# configuring.
#
# Please read through the script throughly. Any known issues with
# this guide will be discussed in the troubleshooting section below.
#
# Requisites: Apache + PHP Setup, GCC, all running under CentOS 6
# Author: Leo Leung (Jan 15, 2012)
#
#######################################################################

# using /root as our working directory
cd ~

# download source
wget http://prdownloads.sourceforge.net/sourceforge/nagios/nagios-3.3.1.tar.gz
wget http://prdownloads.sourceforge.net/sourceforge/nagiosplug/nagios-plugins-1.4.15.tar.gz

# extract source
tar -xzf nagios-3*.tar.gz
tar -xzf nagios-plugins*.tar.gz

# add user 'nagios' as a system user, add apache to the group.
useradd -r -d /usr/local/nagios -s /bin/bash nagios
usermod -G nagios -a apache

# Compile nagios
cd ~/nagios
./configure --with-nagios-user=nagios --with-nagios-grp=nagios
make all
make install
make install-init
make install-config

# Compile nagios plugins
cd ~/nagios-plugins*
./configure
make install

# Configure apache
cd /etc/httpd/conf.d/

# vi nagios.conf (Put the following into nagios.conf):
# ScriptAlias /nagios/cgi-bin/ /usr/local/nagios/sbin/
#
# AllowOverride AuthConfig
# Options ExecCGI
# Allow from all
# Order allow,deny
#

#
# Alias /nagios/ /usr/local/nagios/share/
#
# Options None
# AllowOverride AuthConfig
# Order allow,deny
# Allow from all
#

echo "ScriptAlias /nagios/cgi-bin/ /usr/local/nagios/sbin/" >> nagios.conf
echo "" >> nagios.conf
echo " AllowOverride AuthConfig" >> nagios.conf
echo " Options ExecCGI" >> nagios.conf
echo " Allow from all" >> nagios.conf
echo " Order allow,deny" >> nagios.conf
echo "
" >> nagios.conf
echo "" >> nagios.conf
echo "Alias /nagios/ /usr/local/nagios/share/" >> nagios.conf
echo "" >> nagios.conf
echo " Options None" >> nagios.conf
echo " AllowOverride AuthConfig" >> nagios.conf
echo " Order allow,deny" >> nagios.conf
echo " Allow from all" >> nagios.conf
echo "
" >> nagios.conf

#
# Protect the nagios directory via htpasswd
#
# CONFIGURATION NOTE:
# The default nagios admin username is 'nagiosadmin'. If you wish
# to change this or add another user to have access to the nagios
# system, be sure to add the username to cgi.cfg as a comma
# delimited list.
#
cd /usr/local/nagios/share/

# vi .htaccess (Put the following into .htaccess)
# AuthName "Nagios Access"
# AuthType Basic
# AuthUserFile /usr/local/nagios/etc/htpasswd.users
# require valid-user
echo "AuthName \"Nagios Access\"" >> .htaccess
echo "AuthType Basic" >> .htaccess
echo "AuthUserFile /usr/local/nagios/etc/htpasswd.users" >> .htaccess
echo "require valid-user" >> .htaccess

cp .htaccess /usr/local/nagios/sbin/
cd /usr/local/nagios/etc/
htpasswd -bc htpasswd.users nagiosadmin defaultpassword
chmod 644 htpasswd.users
chown apache:apache htpasswd.users

# apply apache configuration
/etc/init.d/httpd restart

#
# Configuring Nagios
#
cd /usr/local/nagios/etc/

#
# CONFIGURATION NOTE:
# You will want to edit this file manually. However, to get nagios
# working through apache (via CGI), we will need to enable
# check_external_commands.
#
# vi nagios.cfg
# /check_external_commands
# * Set variable to 1 *
#
sed -i -e 's/check_external_commands=0/check_external_commands=1/g' nagios.cfg

# Create the var directory needed by nagios. If you change the paths in
# nagios.cfg to /var, please change the following command accordingly.
mkdir -p /usr/local/nagios/var/spool/checkresults
mkdir -p /usr/local/nagios/var/rw
chown -R nagios:nagios /usr/local/nagios/var/

#
# CONFIGURATION NOTE:
# As noted above, if you wish to add new users to the system, you
# must edit cgi.cfg and add the appropriate usernames for certain
# access roles.
# Example:
# authorized_for_system_information=nagiosadmin
# will let user 'nagiosadmin' access system information. To add user
# 'newadmin', change the line to:
# authoriozed_for_system_information=nagiosadmin,newadmin
# to let anyone who has authenticated, use *
#
# vi cgi.cfg
#
vi cgi.cfg

# Verify the configuration
/usr/local/nagios/bin/nagios -v /usr/local/nagios/etc/nagios.cfg

# If everything from above looks okay, then we should be set to go.
/etc/init.d/nagios start

#
# From here, you should have nagios setup. Going to http://server/nagios/
# should prompt for a username/password and display the nagios web panel.
#
# If you're seeing errors, please refer to the troubleshooting section.
#
# Your next order of business is to configure hosts and services to monitor.
# But that's beyond the scope of this guide.
#

####################################################################
#
# Troubleshooting
#
# PROBLEM 1: When running 'make install' on nagios, an error:
#
# /usr/bin/install: omitting directory `includes/rss/extlib'
# /usr/bin/install: omitting directory `includes/rss/htdocs'
# /usr/bin/install: omitting directory `includes/rss/scripts'
# make[1]: *** [install] Error 1
# make[1]: Leaving directory `/root/nagios/html'
# make: *** [install] Error 2
#
# When accessing main.php, you get a PHP error.
#
# SOLUTION 1:
# It appears that the make file isn't copying the php libraries over properly.
# To fix this, you'll need to copy the files manually:
#
# rm -rf /usr/local/nagios/share/includes/rss/
# cp -R /root/nagios/html/includes/rss/ /usr/local/nagios/share/includes/rss/
# chown -R nagios:nagios /usr/local/nagios/share/includes/rss/
#
# ------------------------
#
# PROBLEM 2: From the web panel, you get the following error when
# updating services or notification settings:
# Error: Could not open command file '/usr/local/nagios/var/rw/nagios.cmd' for update!
#
# SOLUTION 2:
# You need to add apache to the nagios group. Do this by running:
#
# usermod -G nagios -a apache
#
# You might need to restart apache for the changes to take affect.
# /etc/init.d/httpd restart
#
# ------------------------
#
# PROBLEM 3: The .cgi pages are giving 500 errors. error_log shows something similar
# to: (13)Permission denied: exec of '/usr/local/nagios/sbin/status.cgi' failed
#
# SOLUTION 3: There is a permission issue. Try disabling SELinux and see what happens.
#