Odd MySQL Problem using 100% CPU with Nothing Running

For some reason, MySQL (5.5.15) on my home server (running kernel 2.6.32-220.17.1.el6.x86_64) was using all my CPU:

PID USER PR NI VIRT RES SHR S %CPU %MEM TIME+ COMMAND
10949 mysql 20 0 804m 53m 5868 S 125.8 1.6 415:09.88 mysqld

There was nothing running on MySQL.

mysql> show processlist;
+----+------+-----------+------+---------+------+-------+------------------+
| Id | User | Host | db | Command | Time | State | Info |
+----+------+-----------+------+---------+------+-------+------------------+
| 36 | root | localhost | NULL | Query | 0 | NULL | show processlist |
+----+------+-----------+------+---------+------+-------+------------------+
1 row in set (0.00 sec)

My disk wasn’t full.

[root@nas leo]# df
Filesystem 1K-blocks Used Available Use% Mounted on
/dev/sda2 51606140 22222600 26762100 46% /

I tried restarting MySQL a few times, but it continued to use up all the CPU immediately after starting. After scratching my head and not wanting to waste any more time, I simply rebooted the machine and everything was back to normal again.

Documenting this in case someone else has ran into the same problem and possibly has a fix/

Booting Z/OS Emulation Files with Hercules

I recently stumbled across some (illegal) Z/OS emulation files for Hercules on The Pirate Bay a while back, but one thing which I couldn’t figure out was to actually get them working. With a little bit of searching, I’ve finally figured it out. This guide should help anyone who has absolutely no background with IBM mainframes or Hercules – but for some reason wishes to play with a mainframe – to get started.

Step 1: Required Programs and Files

You will need to download and install:

Secondly, you will need to obtain the Z/OS emulation files for Hercules (hint: search TPB or google ‘IBM Z OS Emulation files’)

Step 2: Configure your 3270 Terminal Emulator

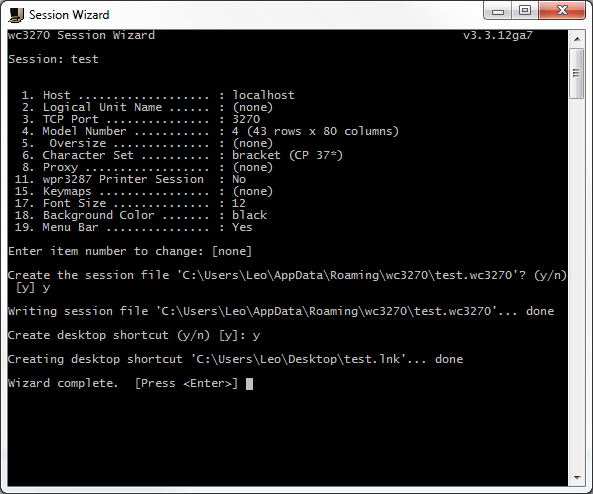
Open the wc3270 Session Wizard and create a new session with the host set to localhost and the TCP port number set to 3270. Be sure to save your session by hitting ‘[Enter]’ at the menu. You may want to create a desktop shortcut to be used later.

Step 3: Configure hercules.cnf

Ensure that your hercules.cnf file references your DASD devices correctly. The paths from the configuration file may be relative. However, in my case, I’ve provided absolute paths.

Note that my DSAD files are on my D:\ibm\cckd\ directory. If you are using relative paths, ensure that your hercules.cnf file is in the correct location, relative to your cckd files.

Ensure your display terminals are set to 3270.

My hercules.cnf is as follows:


#
# Hercules Emulator Control file...
# Description:
# MaxShutdownSecs: 15
#
#
# System parameters
#

ARCHMODE z/Arch
ALRF ENABLE
CCKD RA=2,RAQ=4,RAT=2,WR=2,GCINT=5,GCPARM=0,NOSTRESS=0,TRACE=0,FREEPEND=-1
CNSLPORT 3270
CONKPALV (3,1,10)
CPUMODEL 3090
CPUSERIAL 012345
DIAG8CMD ENABLE
ECPSVM YES
LOADPARM 0A95DB..
LPARNAME HERCULES
MAINSIZE 1024
MOUNTED_TAPE_REINIT DISALLOW
NUMCPU 4
OSTAILOR Z/OS
PANRATE 80
PGMPRDOS LICENSED
SHCMDOPT NODIAG8
SYSEPOCH 1900
TIMERINT 50
TZOFFSET +1400
YROFFSET 0

HERCPRIO 0
TODPRIO -20
DEVPRIO 8
CPUPRIO 0
PANTITLE z/OS 1.9 IPL A80?

# Display Terminals

0700 3270
0701 3270
0702 3270
0703 3270
0704 3270

# DASD Devices

0A81 3390 D:/ibm/cckd/zares1.cckd sf=shadow/zares1_*
0A82 3390 D:/ibm/cckd/zares2.cckd sf=shadow/zares2_*
0A83 3390 D:/ibm/cckd/zadb81.cckd sf=shadow/zadb81_*
0A84 3390 D:/ibm/cckd/zadb82.cckd sf=shadow/zadb82_*
0A85 3390 D:/ibm/cckd/zadb83.cckd sf=shadow/zadb83_*
0A86 3390 D:/ibm/cckd/zadb84.cckd sf=shadow/zadb84_*
0A87 3390 D:/ibm/cckd/zadb91.cckd sf=shadow/zadb91_*
0A88 3390 D:/ibm/cckd/zadb92.cckd sf=shadow/zadb92_*
0A89 3390 D:/ibm/cckd/zacic1.cckd sf=shadow/zacic1_*
0A8A 3390 D:/ibm/cckd/zadis1.cckd sf=shadow/zadis1_*
0A8B 3390 D:/ibm/cckd/zadis2.cckd sf=shadow/zadis2_*
0A8C 3390 D:/ibm/cckd/zadis3.cckd sf=shadow/zadis3_*
0A8D 3390 D:/ibm/cckd/zadis4.cckd sf=shadow/zadis4_*
0A8E 3390 D:/ibm/cckd/zadis5.cckd sf=shadow/zadis5_*
0A8F 3390 D:/ibm/cckd/zadis6.cckd sf=shadow/zadis6_*
0A90 3390 D:/ibm/cckd/zaims1.cckd sf=shadow/zaims1_*
0A91 3390 D:/ibm/cckd/zaprd1.cckd sf=shadow/zaprd1_*
0A92 3390 D:/ibm/cckd/zaprd2.cckd sf=shadow/zaprd2_*
0A93 3390 D:/ibm/cckd/zaprd3.cckd sf=shadow/zaprd3_*
0A94 3390 D:/ibm/cckd/zaprd4.cckd sf=shadow/zaprd4_*
0A95 3390 D:/ibm/cckd/zasys1.cckd sf=shadow/zasys1_*
0A96 3390 D:/ibm/cckd/zauss1.cckd sf=shadow/zauss1_*
0A97 3390 D:/ibm/cckd/zawas1.cckd sf=shadow/zawas1_*
0A98 3390 D:/ibm/cckd/zawas2.cckd sf=shadow/zawas2_*
0A99 3390 D:/ibm/cckd/zawas3.cckd sf=shadow/zawas3_*
0A9A 3390 D:/ibm/cckd/sares1.cckd sf=shadow/sares1_*


Step 4: Starting Hercules

Start hercules on the same directory as your hercules.cnf file. In my case:

D:\ibm>"C:\Program Files\Hercules\Hercules 3.07 (64 Bit)\hercules.exe"

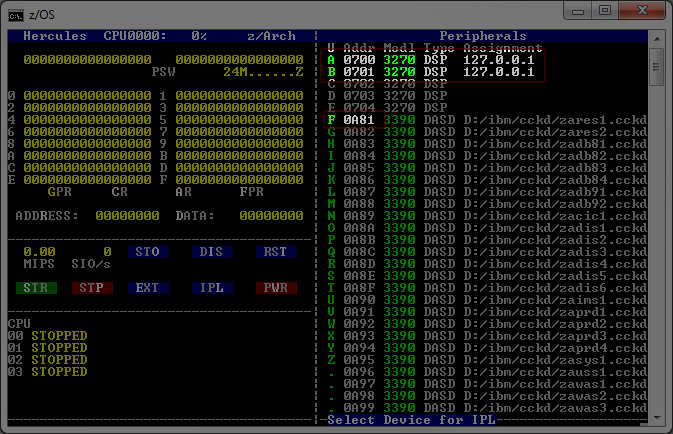
Hercules should start and you should see something similar to:

Press ‘ESC’ to switch to the graphic mode. Start two instances of the 3270 terminals that was made and configured in Step 2. The first will be the console terminal, the second will be the TSO terminal. If everything works, you should see two terminals binded to Hercules:

To start Z/OS, press ‘L’ for IPL, then F for the first Z/OS disk device (as highlighted above). Z/OS should begin loading.

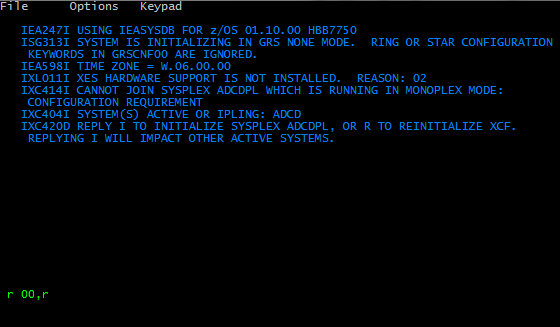
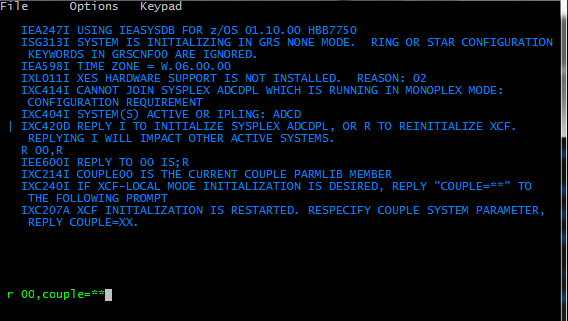
The terminal console should halt and prompt whether to initialize sysplex ADCDPL or to reinitalize XCF. Enter ‘r 00,r’

It will then prompt asking for the couple system parameter. Enter ‘r 00,couple=**’

Step 5: Have Fun

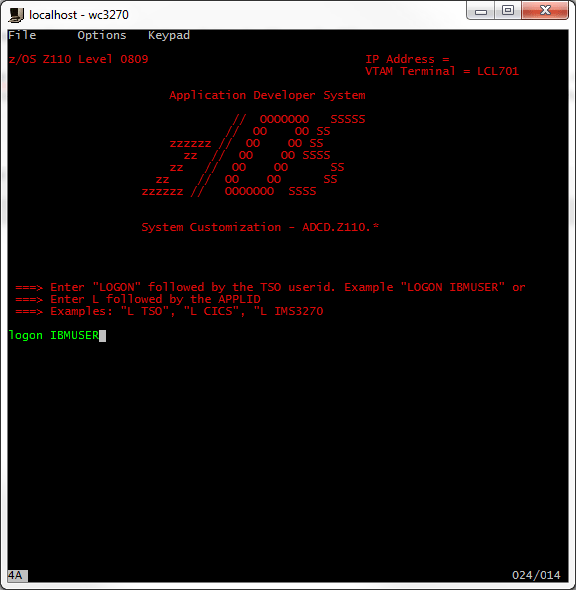
The login screen should appear on the second terminal. You may login as ‘IBMUSER’ with the password ‘SYS1’.

cPanel movingpage.cgi hacked

I got an email today about a list of pages being hacked on a friend’s server. The hacked page were all served from the /cgi-sys/movingpage.cgi location and contained the title “Indonesian Hacker”, displayed the hacker’s name (hmei7) along with a random picture (in this case, Mr. Bean).

Unfortunately, I have no idea how it happened, but it according to the file modified date, this happened about 3 months ago. Any logs from then have since been rotated. It would seem as though they managed to edit the default template for the moving page. These can be edited via WHM and are stored in the /var/cpanel/webtemplates/ directory. In order to remove the hacked page, you’ll need to remove the altered templates from there.

I’d be interested if you happen to know how this was exploited exactly.

Compiling Streamripper on CentOS 5 – Problems & Solutions

If you tried compiling the latest version of streamripper (1.64.6), you’ll probably see the following error:


./configure 

< Snip > 

*** Could not run GLIB test program, checking why...
*** The test program failed to compile or link. See the file config.log for the
*** exact error that occured. This usually means GLIB is incorrectly installed.
configure: error: Glib 2.16 or greater required

If so, try using an older version such as 1.62.0:


cd streamripper-1.62.0
./configure
make

< Snip >

Making all in po
make[3]: Entering directory `/home/leo/streamrip/streamripper-1.62.0/tre-0.7.2/po'
test -z "fi.gmo" || make fi.gmo
make[4]: Entering directory `/home/leo/streamrip/streamripper-1.62.0/tre-0.7.2/po'
rm -f fi.gmo && : -c --statistics -o fi.gmo fi.po
mv: cannot stat `t-fi.gmo': No such file or directory
make[4]: *** [fi.gmo] Error 1
make[4]: Leaving directory `/home/leo/streamrip/streamripper-1.62.0/tre-0.7.2/po'
make[3]: *** [stamp-po] Error 2
make[3]: Leaving directory `/home/leo/streamrip/streamripper-1.62.0/tre-0.7.2/po'
make[2]: *** [all-recursive] Error 1
make[2]: Leaving directory `/home/leo/streamrip/streamripper-1.62.0/tre-0.7.2'
make[1]: *** [all] Error 2
make[1]: Leaving directory `/home/leo/streamrip/streamripper-1.62.0/tre-0.7.2'
make: *** [all-recursive] Error 1

If you run into the error above while compiling, try to configure with the ' --disable-adplug' flag.


./configure --disable-adplug
make
make install

wget: Recursively Download a Directory

Suppose I have a directory with a set of files (and perhaps other directories) under http://example.com/files/distros/ which has directory indexes enabled.

In order to download all files under the ‘distros’ directory using wget, run:


wget -r -np -nH -R index.html http://example.com/files/distros/

Where:
-r : recurse through all files and directories
-np : no parent / do not recurse up to the parent directory
-nH : no host / disable generation of host directories when saving files
-R : reject any files named ‘index.html’

Change Places Bar Locations for File Dialog Boxes in Windows 7

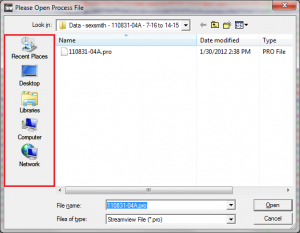
In case you wanted to change the default locations displayed in the places bar on the left of a FileDialog box such as the one shown below under Windows 7, do the following:

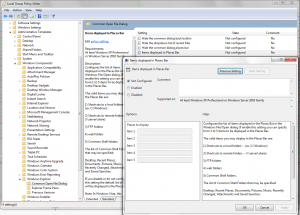
run gpedit.msc

Navigate to User Configuration -> Administrative templates -> Windows Components -> Windows Explorer -> Common Open File Dialog -> Double Click on ‘Items displayed in Places Bar’

On the “Items displayed in Places Bar” window, select Enabled and enter the 5 items that is to be displayed below. Keywords such as ‘Desktop’, ‘Recent Places’, ‘Documents’, ‘Pictures’, etc. can be used in place of the path.

Disable Opera Error Console

One thing that’s been bugging me a lot with Opera is the fact that the error console pops up when errors occur on a web page. This is great and all if you’re trying to debug your own website, however not so much when I’m trying to find a solution to a compile error at 3 in the morning.

As of this writing, Opera 11.51 is the latest version. I can’t guarantee this will work for later versions.

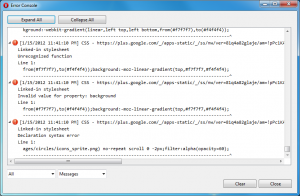
In order to disable this window from popping up, go to opera:config and search for “Error Console Filter”. You should see something similar to:

The Error Console Filter

Clear the field such that the filter is empty, and then click on ‘Save’.

Presto! The error console shall bug you no more.

Setting up Apache 2.2, MySQL 5.5 + Sphinx 2.0, PHP 5.3, a Scripted Guide

Similar to the previous scripted guide, this script will download the source for Apache, MySQL (and optionally with Sphinx, steps denoted in red font), and PHP and compile it under CentOS 5 and 6 on a x86-64 platform.

I’ve had this type of script for a few years now due to the amount of times I’ve had to provision a VPS from scratch. I simply copy/paste the script onto a clean VPS and away it goes setting up a LAMP server from source. This script should not require any existing requisites and should work out-of-the-box on a clean installation of CentOS 6.


#
# We need a few packages in order to compile apache, mysql and PHP from rpmforge.
# Import the key and install the repo.

cd
wget http://packages.sw.be/rpmforge-release/rpmforge-release-0.5.2-2.el6.rf.x86_64.rpm
rpm --import http://apt.sw.be/RPM-GPG-KEY.dag.txt
rpm -K rpmforge-release-0.5.2-2.el6.rf.*.rpm
rpm -i rpmforge-release-0.5.2-2.el6.rf.*.rpm

# Install all prerequisites.
yum -y install make autoconf g++ gcc-c++ libtermcap-devel libgcc-c++ libtool gcc libpng-devel libjpeg-devel libxml1-devel libxml2-devel curl curl-devel libmcrypt libmcrypt-devel libtool-ltdl-devel libxml2.x86_64 libxml2-devel.x86_64 curl-devel.x86_64 openssl-devel

# Download the source files. Sphinx is optional.
mkdir src
cd ~/src
wget http://host.steamr.com/supportfiles/httpd-2.2.21.tar.gz
wget http://host.steamr.com/supportfiles/mysql-5.5.16.tar.gz
wget http://host.steamr.com/supportfiles/php-5.3.8.tar.gz
wget http://host.steamr.com/supportfiles/sphinx-2.0.1-beta.tar.gz

# Extract all archives
for f in `ls *.tar.gz` ; do tar -xzf $f ; done


#
# Setting up apache into /opt/apache
#

cd /root/src/http*/
./configure --prefix=/opt/apache --enable-so --enable-rewrite --enable-ssl --enable-setenvif
make
make install

#
# Setting up MySQL into /opt/mysql.
# Note: MySQL 5.5 and above will require cmake.
#

yum -y install cmake
cd /root/src/mysql*/


# If you wish to compile MySQL with Sphinx, run the following:
cp -R ../sphinx-*/mysqlse/ storage/sphinx
sh BUILD/autorun.sh
./configure --prefix=/opt/mysql --with-plugins=sphinx --with-unix-socket-path=/opt/mysql/mysql.sock --without-man --enable-shared --without-debug --enable-assembler --with-ssl CFLAGS=-O3 'CXXFLAGS=-O3 -fno-exceptions -felide-constructors -fno-rtti' CXX=gcc


# Otherwise, to compile MySQL without Sphinx run:
./configure --prefix=/opt/mysql --with-unix-socket-path=/opt/mysql/mysql.sock --without-man --enable-shared --without-debug --enable-assembler --with-ssl CFLAGS=-O3 'CXXFLAGS=-O3 -fno-exceptions -felide-constructors -fno-rtti' CXX=gcc

make
make install

# Setup the init scripts
/bin/cp support-files/mysql.server /etc/init.d/mysql
chmod 755 /etc/init.d/mysql
ln -s /etc/init.d/mysql /etc/rc3.d/S40mysql

# Copy the default configuration
/bin/cp support-files/my-medium.cnf /etc/my.cnf

# Setup the mysql system account
/usr/sbin/useradd -r mysql

# Update the MySQL permissions
cd /opt/mysql
chown -R mysql .
chgrp -R mysql .

# When setting up the initial database on MySQL 5.4 or earlier, run:
# /opt/mysql/bin/mysql_install_db --user=mysql
# On MySql 5.5 or later, run:

/opt/mysql/scripts/mysql_install_db --user=mysql --basedir=/opt/mysql

# Ensure the new database files created from the previous step is owned by mysql
chown -R mysql /opt/mysql

# Start MySQL manually:
/opt/mysql/bin/mysqld_safe --user=mysql &


#
# MySQL should now be running. You can verify this by running:
# ps -A|grep mysql
#

#
# Set the lib paths of mysql so the libmysqlclient.so or w/e can be found
#

echo "/opt/mysql/lib/mysql" > /etc/ld.so.conf.d/mysql.conf
/sbin/ldconfig


#
# Setting up Sphinx
# NOTE: You must have sphinx compiled with mysql from the previous step.
# You may skip this step if you do not wish to have Sphinx and continue to PHP.
#

cd /root/src/sphinx*
./configure --prefix=/opt/sphinx --with-mysql
make
make install

# The init script used by Sphinx requires sudo.
yum -y install sudo

# Setup the default config
/bin/cp /root/sphinx.conf /opt/sphinx/etc/sphinx.conf

# Setup the init scripts
cp contrib/scripts/searchd /etc/init.d/
chmod 777 /etc/init.d/searchd
ln -s /etc/init.d/searchd /etc/init.d/S55searchd

# Create the sphinx system account and ensure everything under /opt/sphinx/var is owned by sphinx.
useradd -r searchd
cd /opt/sphinx
chown -R searchd:searchd var

#
# Setup PHP as a module for apache:
#

cd /root/src/php*/
./configure --prefix=/opt/php5 --with-apxs2=/opt/apache/bin/apxs --with-config-file-path=/etc/ --with-gd --enable-shmop --enable-track-vars --enable-ftp --enable-sockets --enable-exif --enable-zip --enable-sysvsem --with-zlib --enable-sysvshm --enable-magic-quotes --with-jpeg-dir --with-png-dir --enable-mbstring --enable-embedded-mysqli=shared --with-curl --with-mcrypt --with-mysql=/opt/mysql --with-mysqli=/opt/mysql/bin/mysql_config
# If you want imap support: use options --with-imap --with-imap-ssl=/usr/include/openssl --with-kerberos
make
make install

#
# At this stage, apache should have the PHP module installed.
# NOTE: Since apache does not come with an init script, you must install
# this manually. Refer to http://leo.steamr.com/?p=229 for the complete
# script. Ensure to change the path (in red) to the correct path to httpd.
# In this case, /opt/apache/bin/httpd
#

Setting up Nagios 3.3.1, a scripted guide

Since I wanted to automate the task of setting up a clean install of Nagios, I’ve made a script which will setup Nagios with apache from source. This script can be used as a how-to guide for anyone who’s trying to setup nagios for the first time. However, the main purpose is to enable me to quickly deploy a Nagios installation using an existing script.

#
# Setting up nagios 3.3.1 + nagios plugins 1.4.15 How-To Guide
#
# This guide will compile nagios from source, configure apache to
# serve nagios from the /nagios/ directory, and basic configuration
# of nagios.
#
# Nagios will be installed in the default /usr/local/nagios/
# directory. Change this by providing the --prefix argument when
# configuring.
#
# Please read through the script throughly. Any known issues with
# this guide will be discussed in the troubleshooting section below.
#
# Requisites: Apache + PHP Setup, GCC, all running under CentOS 6
# Author: Leo Leung (Jan 15, 2012)
#
#######################################################################

# using /root as our working directory
cd ~

# download source
wget http://prdownloads.sourceforge.net/sourceforge/nagios/nagios-3.3.1.tar.gz
wget http://prdownloads.sourceforge.net/sourceforge/nagiosplug/nagios-plugins-1.4.15.tar.gz

# extract source
tar -xzf nagios-3*.tar.gz
tar -xzf nagios-plugins*.tar.gz

# add user 'nagios' as a system user, add apache to the group.
useradd -r -d /usr/local/nagios -s /bin/bash nagios
usermod -G nagios -a apache

# Compile nagios
cd ~/nagios
./configure --with-nagios-user=nagios --with-nagios-grp=nagios
make all
make install
make install-init
make install-config

# Compile nagios plugins
cd ~/nagios-plugins*
./configure
make install

# Configure apache
cd /etc/httpd/conf.d/

# vi nagios.conf (Put the following into nagios.conf):
# ScriptAlias /nagios/cgi-bin/ /usr/local/nagios/sbin/
#
# AllowOverride AuthConfig
# Options ExecCGI
# Allow from all
# Order allow,deny
#

#
# Alias /nagios/ /usr/local/nagios/share/
#
# Options None
# AllowOverride AuthConfig
# Order allow,deny
# Allow from all
#

echo "ScriptAlias /nagios/cgi-bin/ /usr/local/nagios/sbin/" >> nagios.conf
echo "" >> nagios.conf
echo " AllowOverride AuthConfig" >> nagios.conf
echo " Options ExecCGI" >> nagios.conf
echo " Allow from all" >> nagios.conf
echo " Order allow,deny" >> nagios.conf
echo "
" >> nagios.conf
echo "" >> nagios.conf
echo "Alias /nagios/ /usr/local/nagios/share/" >> nagios.conf
echo "" >> nagios.conf
echo " Options None" >> nagios.conf
echo " AllowOverride AuthConfig" >> nagios.conf
echo " Order allow,deny" >> nagios.conf
echo " Allow from all" >> nagios.conf
echo "
" >> nagios.conf

#
# Protect the nagios directory via htpasswd
#
# CONFIGURATION NOTE:
# The default nagios admin username is 'nagiosadmin'. If you wish
# to change this or add another user to have access to the nagios
# system, be sure to add the username to cgi.cfg as a comma
# delimited list.
#
cd /usr/local/nagios/share/

# vi .htaccess (Put the following into .htaccess)
# AuthName "Nagios Access"
# AuthType Basic
# AuthUserFile /usr/local/nagios/etc/htpasswd.users
# require valid-user
echo "AuthName \"Nagios Access\"" >> .htaccess
echo "AuthType Basic" >> .htaccess
echo "AuthUserFile /usr/local/nagios/etc/htpasswd.users" >> .htaccess
echo "require valid-user" >> .htaccess

cp .htaccess /usr/local/nagios/sbin/
cd /usr/local/nagios/etc/
htpasswd -bc htpasswd.users nagiosadmin defaultpassword
chmod 644 htpasswd.users
chown apache:apache htpasswd.users

# apply apache configuration
/etc/init.d/httpd restart

#
# Configuring Nagios
#
cd /usr/local/nagios/etc/

#
# CONFIGURATION NOTE:
# You will want to edit this file manually. However, to get nagios
# working through apache (via CGI), we will need to enable
# check_external_commands.
#
# vi nagios.cfg
# /check_external_commands
# * Set variable to 1 *
#
sed -i -e 's/check_external_commands=0/check_external_commands=1/g' nagios.cfg

# Create the var directory needed by nagios. If you change the paths in
# nagios.cfg to /var, please change the following command accordingly.
mkdir -p /usr/local/nagios/var/spool/checkresults
mkdir -p /usr/local/nagios/var/rw
chown -R nagios:nagios /usr/local/nagios/var/

#
# CONFIGURATION NOTE:
# As noted above, if you wish to add new users to the system, you
# must edit cgi.cfg and add the appropriate usernames for certain
# access roles.
# Example:
# authorized_for_system_information=nagiosadmin
# will let user 'nagiosadmin' access system information. To add user
# 'newadmin', change the line to:
# authoriozed_for_system_information=nagiosadmin,newadmin
# to let anyone who has authenticated, use *
#
# vi cgi.cfg
#
vi cgi.cfg

# Verify the configuration
/usr/local/nagios/bin/nagios -v /usr/local/nagios/etc/nagios.cfg

# If everything from above looks okay, then we should be set to go.
/etc/init.d/nagios start

#
# From here, you should have nagios setup. Going to http://server/nagios/
# should prompt for a username/password and display the nagios web panel.
#
# If you're seeing errors, please refer to the troubleshooting section.
#
# Your next order of business is to configure hosts and services to monitor.
# But that's beyond the scope of this guide.
#

####################################################################
#
# Troubleshooting
#
# PROBLEM 1: When running 'make install' on nagios, an error:
#
# /usr/bin/install: omitting directory `includes/rss/extlib'
# /usr/bin/install: omitting directory `includes/rss/htdocs'
# /usr/bin/install: omitting directory `includes/rss/scripts'
# make[1]: *** [install] Error 1
# make[1]: Leaving directory `/root/nagios/html'
# make: *** [install] Error 2
#
# When accessing main.php, you get a PHP error.
#
# SOLUTION 1:
# It appears that the make file isn't copying the php libraries over properly.
# To fix this, you'll need to copy the files manually:
#
# rm -rf /usr/local/nagios/share/includes/rss/
# cp -R /root/nagios/html/includes/rss/ /usr/local/nagios/share/includes/rss/
# chown -R nagios:nagios /usr/local/nagios/share/includes/rss/
#
# ------------------------
#
# PROBLEM 2: From the web panel, you get the following error when
# updating services or notification settings:
# Error: Could not open command file '/usr/local/nagios/var/rw/nagios.cmd' for update!
#
# SOLUTION 2:
# You need to add apache to the nagios group. Do this by running:
#
# usermod -G nagios -a apache
#
# You might need to restart apache for the changes to take affect.
# /etc/init.d/httpd restart
#
# ------------------------
#
# PROBLEM 3: The .cgi pages are giving 500 errors. error_log shows something similar
# to: (13)Permission denied: exec of '/usr/local/nagios/sbin/status.cgi' failed
#
# SOLUTION 3: There is a permission issue. Try disabling SELinux and see what happens.
#
MySQL Binary Logs

If you have binary logging enabled in MySQL, it’s quite possible that the disk used by these binary logs to be is quite high.

For instance:

bash-3.2# ls -al /opt/mysql/var/
total 16240180
drwx------  5 mysql root        4096 Sep 30 15:33 .
drwxr-xr-x 11 mysql mysql       4096 Sep 30 15:33 ..
drwx------  2 mysql root        4096 Aug 15 02:15 mysql
-rw-rw----  1 mysql mysql      19103 Aug 15 02:15 mysql-bin.000001
-rw-rw----  1 mysql mysql     729901 Aug 15 02:15 mysql-bin.000002
-rw-rw----  1 mysql mysql        125 Aug 15 02:15 mysql-bin.000003
-rw-rw----  1 mysql mysql        106 Aug 15 02:15 mysql-bin.000004
-rw-rw----  1 mysql mysql 1074557984 Sep 18 17:59 mysql-bin.000005
-rw-rw----  1 mysql mysql 1074199027 Sep 18 18:52 mysql-bin.000006
-rw-rw----  1 mysql mysql   47809403 Sep 18 18:53 mysql-bin.000007
-rw-rw----  1 mysql mysql 1077169445 Sep 18 18:55 mysql-bin.000008
-rw-rw----  1 mysql mysql 1074419095 Sep 18 18:57 mysql-bin.000009
-rw-rw----  1 mysql mysql 1073742057 Sep 18 21:41 mysql-bin.000010
-rw-rw----  1 mysql mysql 1073742056 Sep 19 03:58 mysql-bin.000011
-rw-rw----  1 mysql mysql 1073781146 Sep 19 10:53 mysql-bin.000012
-rw-rw----  1 mysql mysql 1073742068 Sep 20 01:15 mysql-bin.000013
-rw-rw----  1 mysql mysql 1073754553 Sep 22 18:22 mysql-bin.000014
-rw-rw----  1 mysql mysql  158604158 Sep 25 18:33 mysql-bin.000015
-rw-rw----  1 mysql mysql        125 Sep 25 18:36 mysql-bin.000016
-rw-rw----  1 mysql mysql        125 Sep 25 19:21 mysql-bin.000017
-rw-rw----  1 mysql mysql        125 Sep 25 19:47 mysql-bin.000018
-rw-rw----  1 mysql mysql    5212790 Sep 25 20:34 mysql-bin.000019
-rw-rw----  1 mysql mysql 1073741925 Sep 26 01:43 mysql-bin.000020
-rw-rw----  1 mysql mysql 1073741893 Sep 26 03:43 mysql-bin.000021
-rw-rw----  1 mysql mysql 1073741937 Sep 26 14:24 mysql-bin.000022
-rw-rw----  1 mysql mysql 1073741938 Sep 27 08:38 mysql-bin.000023
-rw-rw----  1 mysql mysql 1073746311 Sep 28 20:43 mysql-bin.000024
-rw-rw----  1 mysql mysql  875141163 Sep 30 15:22 mysql-bin.000025
-rw-rw----  1 mysql mysql  488120905 Oct  4 01:52 mysql-bin.000026
-rw-rw----  1 mysql mysql        494 Sep 30 15:33 mysql-bin.index
...
bash-3.2# du -ch mysql-bin*|grep total
16G     total

I’ve had these binary logs fill up a neglected server’s disks to 100% which caused quite a bit of pain.

To manually clear these logs, run the PURGE BINARY LOGS command in MySQL.


mysql> show binary logs;
+------------------+------------+
| Log_name         | File_size  |
+------------------+------------+
| mysql-bin.000001 |      19103 |
| mysql-bin.000002 |     729901 |
| mysql-bin.000003 |        125 |
| mysql-bin.000004 |        106 |
| mysql-bin.000005 | 1074557984 |
| mysql-bin.000006 | 1074199027 |
| mysql-bin.000007 |   47809403 |
| mysql-bin.000008 | 1077169445 |
| mysql-bin.000009 | 1074419095 |
| mysql-bin.000010 | 1073742057 |
| mysql-bin.000011 | 1073742056 |
| mysql-bin.000012 | 1073781146 |
| mysql-bin.000013 | 1073742068 |
| mysql-bin.000014 | 1073754553 |
| mysql-bin.000015 |  158604158 |
| mysql-bin.000016 |        125 |
| mysql-bin.000017 |        125 |
| mysql-bin.000018 |        125 |
| mysql-bin.000019 |    5212790 |
| mysql-bin.000020 | 1073741925 |
| mysql-bin.000021 | 1073741893 |
| mysql-bin.000022 | 1073741937 |
| mysql-bin.000023 | 1073741938 |
| mysql-bin.000024 | 1073746311 |
| mysql-bin.000025 |  875141163 |
| mysql-bin.000026 |  492014457 |
+------------------+------------+
26 rows in set (0.00 sec)

mysql> purge binary logs before '2011-08-01';
Query OK, 0 rows affected (1.61 sec)

The above purge command did not clear anything. Rather than specifying the date, it’s also possible to purge all logs before a specified file by running something like:

mysql> purge binary logs to 'mysql-bin.000005';
Query OK, 0 rows affected (6.25 sec)

mysql> show binary logs;
+------------------+------------+
| Log_name         | File_size  |
+------------------+------------+
| mysql-bin.000005 | 1074557984 |
| mysql-bin.000006 | 1074199027 |
| mysql-bin.000007 |   47809403 |
| mysql-bin.000008 | 1077169445 |
| mysql-bin.000009 | 1074419095 |
| mysql-bin.000010 | 1073742057 |
| mysql-bin.000011 | 1073742056 |
| mysql-bin.000012 | 1073781146 |
| mysql-bin.000013 | 1073742068 |
| mysql-bin.000014 | 1073754553 |
| mysql-bin.000015 |  158604158 |
| mysql-bin.000016 |        125 |
| mysql-bin.000017 |        125 |
| mysql-bin.000018 |        125 |
| mysql-bin.000019 |    5212790 |
| mysql-bin.000020 | 1073741925 |
| mysql-bin.000021 | 1073741893 |
| mysql-bin.000022 | 1073741937 |
| mysql-bin.000023 | 1073741938 |
| mysql-bin.000024 | 1073746311 |
| mysql-bin.000025 |  875141163 |
| mysql-bin.000026 |  495852653 |
+------------------+------------+
22 rows in set (0.00 sec)

As you can see, all logs up to 000005 was deleted.

To disable binary logging if your server is not replicating itself by editing removing log-bin=mysql-bin in mysql.cnf